Showing posts with label Lawn Fawn. Show all posts

Tuesday, September 7, 2021

Happy Fall Ya'all with Dies R Us!!!!

Happy Tuesday everyone!  Lisa here, sharing a fall themed card with lots of shimmer!  I combined products from Frantic Stamper, Lawn Fawn and Tutti Designs to make this card!


I started my project by choosing a fall-themed background die by Frantic Stamper called Swirling Leaves Stitched Background.  It's 3.5" by 5" so I ran it through my die cut machine twice on my 6.75" x 4.75" mat.  You can't even see the line between the two, the die lines up beautifully.


I decided I wanted to use a stamp since September is National Stamping Month, so I pulled out my Lawn Fawn Before 'N Afters stamp set.  


I chose to pair the stamp set with one of my favorite die sets, Tutti Designs Cross Stitch Banners.  Unfortunately, I somehow deleted the photos I took of the stamping, coloring and inking processes.  My apologies!  I do have a photo of the card before I adhered it together and embellished it.

I hope this card inspires to make a fun fall card with any of the fun and amazing dies that Dies R Us carries.  --Lisa

Products Used:


Don't forget to come join in the fun at the Dies R Us Challenge Blog. There's a new challenge theme offered on the 1st and 15th of each month and one lucky randomly drawn winner will receive a gift voucher prize to the Dies R Us Store.  


 For your convenience, all the important Dies R Us links are provided below.


click below for:

STORE

CHALLENGE BLOG

FACEBOOK

INSPIRATION BLOG

FRIENDS OF DIES R US PINTEREST PAGE


Tuesday, August 10, 2021

A Fairy Hello with Dies R Us!!

 Happy Tuesday everyone!  Lisa here, with a fun fairy hello card.  The fairy isn't even the star of the show, the layered background dies from Birch Press are!!!  Check out how Dazzle-ing they are.


Aren't they amazing?  These are the Birch Press Dazzle layering dies.  You get a set of three and omg they're all fabulous because yes, you can use them individually, but layered is pure papery greatness!!


So let me tell you how this card even came to be.  I was going to do something completely different but I got some new cardstock and when I saw these three colors together, the card just kind of blew up from there.


I found that the layers were missing something, so I cut the top out of black glitter paper instead of the textured cardstock and added it on top for dimension.  I don't find the centers of these dies really need a lot of adhesive, so instead of putting adhesive on the paper before cutting the dies, I just put Scor Tape all around the frame and a few pieces in the center.  Easy Peasy!


I wanted to add a fairy, so I pulled out my Tutti Designs Mini Fairies set.  I had a hard time deciding which one to use and where to put him or her.


My card needed a sentiment so I pulled out an oldie but goodie, Lawn Fawn Scripty Hello.  I decided here to cut off the flowers in the hands of the fairy on the left.  I wanted it to look like the fairy was holding the greeting.


The final finishing touch it needed was some bling!  I used three sizes of clear AB gems to accent the sentiment on the card.  I love how it came together.

I hope this card inspires to check out all the amazing Birch Press layering dies that Dies R Us carries.  They're so fun and versatile.  --Lisa


Products Used:


Don't forget to come join in the fun at the Dies R Us Challenge Blog. There's a new challenge theme offered on the 1st and 15th of each month and one lucky randomly drawn winner will receive a gift voucher prize to the Dies R Us Store.  


 For your convenience, all the important Dies R Us links are provided below.


click below for:

STORE

CHALLENGE BLOG

FACEBOOK

INSPIRATION BLOG

FRIENDS OF DIES R US PINTEREST PAGE


Tuesday, April 27, 2021

Spring Birthday Slimline with Dies R Us Inspiration Blog!!

Hi everyone!  I'm here today with a fun and springy slimline birthday card on the Dies R Us blog!  I have to say that I was originally going to make this card is more jewel tones, but then we got snow in April and I was like, SPRING!  I made the focal layer of my card out of scraps, believe it or not.


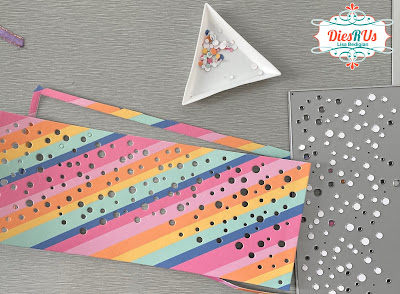
So I started out with all these scraps from some baby cards I made for a friend.  You can't really tell in the photo but they're pastel shimmery card stock, not too heavyweight, so they're perfect for layering and then die cutting.


The strips vary in size from about an eighth of an inch to maybe five eights of an inch.  You can use any size for this technique, I just like the look of different sizes.  I'm going to be cutting this background with my Catherine Pooler Slimline Flurries die.  I wanted to use this because a) I love this die and don't just wanna use it at Christmastime and b) I totally think it looks like confetti!  This background is rather detailed, so I used a very lightweight (65lb) white cardstock to build my background on.  I cut it slightly bigger than my die, 8.75" by 3.75", and covered it with 1/2" Scor Tape.


You can see where I wrinkled the tape on the end, but it won't matter because the whole thing will be covered in cardstock and then die cut.  I feel like die cutting helps to push the paper into the tape.


I kept every single dot that I punched out of this background and the die.  I want to use them for a shaker card in the future.


I cut my Impression Obsession Happy Birthday die out of silver glitter cardstock that has 1/2" Scor Tape on the back so it's already adhesive.  Love love love my Scor Tape!  I layered foam tape behind the die cut panel before adhering it to some silver glitter cardstock.  I like how the silver behind the stripes almost gives a faux shaker look.


So these balloons were a last minute addition.  I forgot to take a photo of the die cutting but I used the Lawn Fawn Outside In Balloons die set for these.  I used the smallest balloon and both strings, then added the largest bow.  I didn't put Scor Tape on the back of the balloons because I wasn't sure if I was going to pop any of them up with foam tape or not, but I did put it on the rose gold foil I used for the strings and bow.  Made adhering those teeny tiny strings a breeze.

I hope this inspires you to dig through your scraps and see what kind of backgrounds you can create.  Have a crafty day!  --Lisa


Products Used:


Don't forget to come join in the fun at the Dies R Us Challenge Blog. There's a new challenge theme offered on the 1st and 15th of each month and one lucky randomly drawn winner will receive a gift voucher prize to the Dies R Us Store.  


 For your convenience, all the important Dies R Us links are provided below.


click below for:

STORE

CHALLENGE BLOG

FACEBOOK

INSPIRATION BLOG

FRIENDS OF DIES R US PINTEREST PAGE